Spring ApplicationContext与常用接口笔记

一、在Web项目中的ApplicationContext

在web 项目中(spring mvc),系统会存在两个容器,一个是ApplicationContext,另一个就是我们自己的WebApplicationContext(作为ApplicationContext的子容器)。

  • ApplicationContext: 默认配置文件名applicationContext.xml,通过org.springframework.web.context.ContextLoaderListener进行加载并初始化。
  • WebApplicationContext: 默认配置文件名xxx-servlet.xml,xxx为DispatcherServlet配置的servlet-name, 通过org.springframework.web.servlet.DispatcherServlet进行加载并初始化。

WebApplicationContext通过getParent()获取到ApplicationContext,而ApplicationContext的getParent()将获取到null(ApplicationContext没有父容器)。

二、Spring常用接口

org.springframework.beans.factory.InitializingBean

InitializingBean表示为spring管理的初始类,当Bean初始时进行属性注入完成后调用afterPropertiesSet进行初始处理。( 趟坑笔记 add by 2017-07-18)

org.springframework.beans.factory.FactoryBean

FactoryBean 是创建 复杂的bean,一般的bean 直接用xml配置即可,如果一个bean的创建过程中涉及到很多其他的bean 和复杂的逻辑,用xml配置比较困难,这时可以考虑用FactoryBean。

spring配置时会自动调用getObject来获取注入对象。

@see org.springframework.web.accept.ContentNegotiationManagerFactoryBean

org.springframework.context.ApplicationListener

ApplicationListener用于监听应用程序的事件。
所包含的事件详见ApplicationEvent子类。
当Application事件发生时会自动调用监听器的onApplicationEvent方法。

org.springframework.context.ApplicationContextAware

ApplicationContextAware用于用户保存ApplicationContext的引用,供客户端程序获取ApplicationContext时使用。

org.springframework.beans.factory.DisposableBean

DisposableBean用于标识可销毁的类,当类进行回收时调用destroy()


观点仅代表自己,期待你的留言。

工具_源代码生成器GGCode

简介

通过近期的努力,将编写的源代码生成器进行0.0.1版本的封版,代码生成器按数据表自动生成源代码包含简单业务的(增,删,改,查,分页等)。
部分集成的开源框架已通过配置文件进行开关配置,方便按业务进行开启和关闭。欢迎大家使用。
Github地址:https://github.com/stotem/GGCode

基础框架

源代码生成框架: rapid-framework

UI框架: sb-admin-2

代码框架: SpringMVC + mybatis + Velocity。

代码架构: 经典三层架构(MVC), 增加rpc模块做为调用三方api模块, 增加manager模块设置为缓存层与事务层。

主要转换规则:

  1. 数据表与数据列的注释做为UI展示title。
  2. 数据列的为空性、数据长度和是否可为空等属性转换为javax.validation的判断规则。
  3. 数据列的数据类型转换为实体对象属性的数据类型。

集成功能

  1. 增加shiro做为权限管理框架。
  2. 为文档数据存储添加MongoDB支持。
  3. 为缓存增加Redis支持, 且自动配置Spring Cache为Redis缓存。
  4. 以Velocity做为页面模板语言。
  5. 增加javax.validation为服务端验证框架。且Controller自动验证传入参数。
  6. 采用bonecp对数据库连接池化管理。
  7. spring的响应数据采用多视图配置。

如何使用?

在bin目录中通过配置generator.xml后直接java -jar GGCode-0.0.1.jar

generator.xml配置说明

详见generator.xml注释

数据库设计要求

为了规范生成的Code,针对数据表的设计,需要满足每张表包含以下字段,请使用者遵守:

1
2
3
4
data_id bigint PRIMARY KEY COMMENT '数据主键(与业务主键区分)', 
del_flag tinyint(1) DEFAULT 1 COMMENT '数据删除标识(1: 有效,2: 失效)',
create_time timestamp COMMENT '数据创建时间',
update_time timestamp COMMENT '数据最后update时间',

其它说明

  1. controller的访问URI不带后缀.
  2. 所有的页面文件后缀为view.

生成后程序截图


观点仅代表自己,期待你的留言。

Shiro与Cas集成后的登录流程时序图

框架介绍

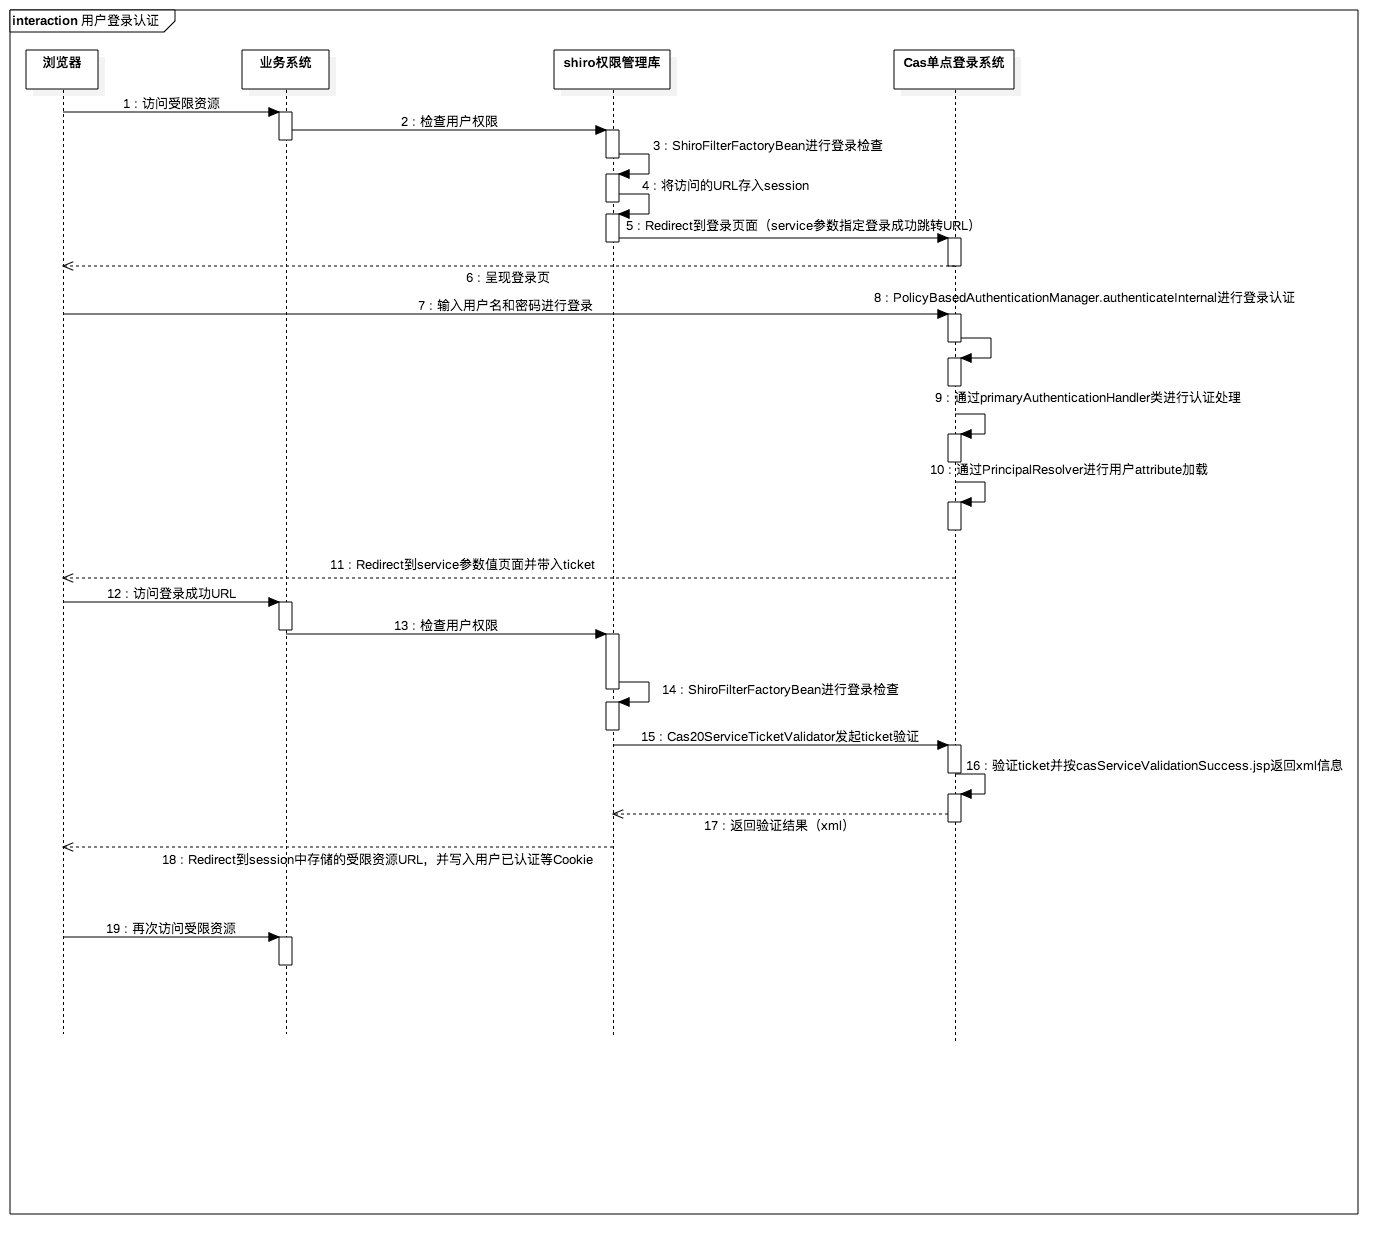
Shiro是apache开源项目,主要用户客户端管理登录用户权限提示非常方式的认证接口及丰富的注解。
CAS ( Central Authentication Service )是Yale大学发起的一个企业级的、开源的项目,旨在为 Web 应用系统提供一种可靠的单点登录解决方案(属于Web SSO)。主要用于用户登录认证与登录有效期认证。

调用时序

集成cas与shiro后的用户登录时序图


观点仅代表自己,期待你的留言。

开源SSO项目cas认证返回更多的attribute信息

CAS项目介绍

介绍网址: https://github.com/apereo/cas
github地址:https://github.com/apereo/cas.git

默认情况下,当用户认证成功后,客户端代码中只能获取到用户的登录名称,不能获取到其它的信息(如:手机号,所属角色,已有授权等),好在提供了一个attribute的map可以进行其它信息的返回。

1
2
3
AttributePrincipal ap = AssertionHolder.getAssertion().getPrincipal();
String name = ap.getName();
Map<String,Object> attribute = ap.getAttributes();

增加attribute信息返回

修改ticket验证接口返回的xml信息

找到WEB-INF/view/jsp/protocol/2.0/casServiceValidationSuccess.jsp,在节点之前添加以下内容。

1
2
3
4
5
6
7
8
9
10
11
12
13
14
<cas:serviceResponse xmlns:cas='http://www.yale.edu/tp/cas'>
<cas:authenticationSuccess>
//...原有信息..//
<c:if test="${fn:length(assertion.chainedAuthentications[fn:length(assertion.chainedAuthentications)-1].principal.attributes) > 0}">
<cas:attributes>
<c:forEach var="attr" items="${assertion.chainedAuthentications[fn:length(assertion.chainedAuthentications)-1].principal.attributes}">
<cas:attribute>
<cas:${fn:escapeXml(attr.key)}>${fn:escapeXml(attr.value)}</cas:${fn:escapeXml(attr.key)}>
</cas:attribute>
</c:forEach>
</cas:attributes>
</c:if>
</cas:authenticationSuccess>
</cas:serviceResponse>

在用户登录验证时增加attribute关联

在deployerConfigContext.xml配置文件中,默认采用AcceptUsersAuthenticationHandler类的users属性(以key为登录名value为密码)进行系统用户的设定。
而通过PersonDirectoryPrincipalResolver的attributeRepository属性进行attribute映射和配置。默认由NamedStubPersonAttributeDao类的backingMap属性进行key-value配置,针对所有的用户都生效。
提示:IPersonAttributeDao有很多的子类实现,可以通过源码查看各自实现的方式,我这里主要介绍json,xml和数据库三种方式实现。

json配置的方式

而在实际业务系统设计中针对不同的用户需要返回不同的attribute这个需求似乎不太适用,经过查看可能配置JsonBackedComplexStubPersonAttributeDao来在json中针对单个用户attribute进行配置。指定init-method为init方法
配置如下:

1
2
3
<bean id="attributeRepository" class="org.jasig.services.persondir.support.JsonBackedComplexStubPersonAttributeDao" init-method="init">
<constructor-arg index="0" value="classpath:users.json" />
</bean>

users.json

1
2
3
4
5
6
7
8
9
10
11
12
13
14
15
16
{
"user1":{
"id":["1001"],
"firstName":["View"],
"lastName":["Jack"],
"roles":["view"],
"permissions":["support:*:view"]
},
"user2":{
"id":["1002"],
"firstName":["Admin"],
"lastName":["One"],
"roles":["admin"],
"permissions":["support"]
}
}

xml配置的方式

配置attributeRepository为XmlPersonAttributeDao来在xml中针对单个用户的attribute进行配置。
配置如下:

1
2
3
<bean id="attributeRepository" class="org.jasig.services.persondir.support.xml.XmlPersonAttributeDao">
<property name="mappedXmlResource" value="classpath:users.xml" />
</bean>

database读取的方式

配置attributeRepository为NamedParameterJdbcPersonAttributeDao来在数据库按用户名进行attribute的配置加载。

1
2
3
4
5
6
7
8
9
10
11
12
13
14
15
16
17
18
19
20
<bean id="attributeRepository" class="org.jasig.services.persondir.support.jdbc.SingleRowJdbcPersonAttributeDao">
<property name="dataSource" ref="datasource" />
<property name="sql" value="select email,name,username,password from cas_user where {0}" />
<!-- 组装sql用的查询条件属性 -->
<property name="queryAttributeMapping">
<map>
<!-- key必须是uername而且是小写否则会导致取不到用户的其它信息,value对应数据库用户名字段,系统会自己匹配 -->
<entry key="username" value="username" />
</map>
</property>
<property name="resultAttributeMapping">
<map>
<!-- key为对应的数据库字段名称,value为提供给客户端获取的属性名字,系统会自动填充值 -->
<entry key="username" value="username" />
<entry key="email" value="email" />
<entry key="name" value="name" />
<entry key="password" value="password" />
</map>
</property>
</bean>

密码加密方式配置

在实际开发中不能任由密码明文进行传输,一般来讲会进行加密。而cas可直接通过配置的方式进行加密方式的确定。
在配置的AcceptUsersAuthenticationHandler中继承了父类中的一个名为passwordEncoder的PasswordEncoder类型属性。通过给这个属性配置加密方式值就能实现。默认为PlainTextPasswordEncoder加密方式。
如配置md5的方式:

1
2
3
4
5
6
7
8
9
10
11
12
13
<bean id="primaryAuthenticationHandler" class="org.jasig.cas.authentication.AcceptUsersAuthenticationHandler">
<property name="passwordEncoder" ref="passwordEncoder" />
<property name="users">
<map>
<entry key="user1" value="123" />
<entry key="user2" value="123" />
</map>
</property>
</bean>
<bean id="passwordEncoder" class="org.jasig.cas.authentication.handler.DefaultPasswordEncoder">
<property name="characterEncoding" value="utf-8" />
<property name="encodingAlgorithm" value="MD5" />
</bean>

提示:配置了密码方式之后,所有配置文件或数据库中所存储的密码则应修改为密文。

重要发现

用户登录验证采用的AuthenticationHandler接口的子类实现,当我们自定义实现类完成验证时,不要妄想在通过HandlerResult的getPrincipal()获取到Principal然后给它设置attribute,因为cas在调用认证方式后会针对Principal的数据进行name的复制,所以即使你的认证方式进行了attribute的设置,在进行对象复制时也会丢掉。

详见:PolicyBasedAuthenticationManager的authenticateInternal方法中的逻辑。
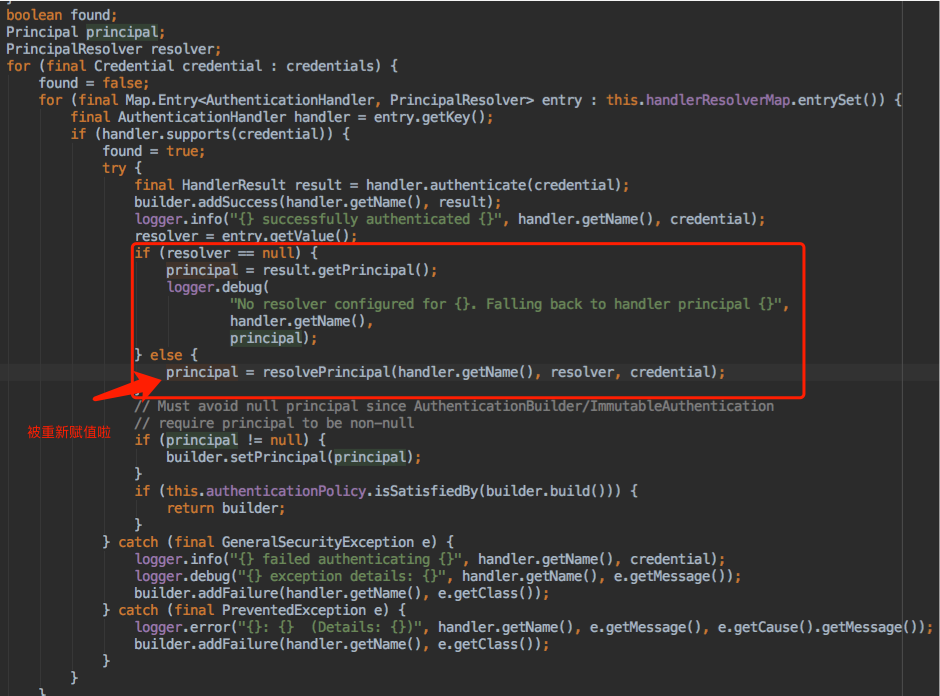
PolicyBasedAuthenticationManager-authenticateInternal


观点仅代表自己,期待你的留言。

妙用Spring中的CompositeCacheManager

简介

Spring提供了@Cacheable,@CacheEvict,@CachePut等注解很方便有实现数据的缓存,而CompositeCacheManager主要用于集合多个CacheManager实例,在使用多种缓存容器时特别有用。

fallbackToNoOpCache属性的真实意义

经过查看Spring 4.1.9.RELEASE的源码,当CompositeCacheManager的fallbackToNoOpCache属性设置为true时,CompositeCacheManager会在已配置的cacheManagers末尾添加一个NoOpCacheManager。
当通过代码中指定的缓存容器(@Cacheable等注解设置的value)没有在cacheManagers中都找到时,则会进入到NoOpCacheManager中,此时就相当于禁用掉了缓存,而不抛出相应的异常。

网络上有朋友在说,当设置fallbackToNoOpCache属性设置为true时,则可以解决缓存容器没有准备好时自动禁用缓存的效果,经过查看Spring源码,并未实现。
不过,经测试以下方法可以实现通过配置禁用缓存。

通过配置禁用缓存

利用CompositeCacheManager + NoOpCacheManager还能解决当缓存容器没有准备好(缓存容器崩溃,网络不可用等)或者需要暂时去掉缓存的需求。

只需要将cacheManagers的list值的第一个元素设置为NoOpCacheManager就OK了。

spring.xml

1
2
3
4
5
6
7
8
9
<bean id="cacheManager" class="org.springframework.cache.support.CompositeCacheManager">
<property name="cacheManagers">
<list>
<bean class="org.springframework.cache.support.NoOpCacheManager" />
<ref bean="simpleCacheManager" />
</list>
</property>
<property name="fallbackToNoOpCache" value="true" />
</bean>

观点仅代表自己,期待你的留言。

类Google分页算法

1
2
3
4
5
6
7
8
9
10
11
12
13
14
15
16
17
18
19
20
21
22
23
24
25
26
27
28
29
30
31
32
33
34
35
36
37
38
39
40
41
42
public class Pagination {

@Test
public void getPagination() {
final int[] paginationRegion = getPaginationRegion(6, 5, 10);
// 进行页码输出
System.out.println(Arrays.toString(paginationRegion));
for (int i=paginationRegion[0]; i<= paginationRegion[1];i++) {
//....
}
}

/**
* 类Google分页 - 获取需要显示的闭区间页码范围
* @param currPage 当前页码
* @param showNum 显示条数,为保持当前页码居中,建议为单数值
* @param totalPage 总页数
* @return 闭区间 页码范围
*/
private static int[] getPaginationRegion(int currPage, int showNum, int totalPage) {
// 先进行基础运算
int startNum = currPage - showNum/2;
int endNum = currPage + showNum/2;
if (endNum > totalPage) {
endNum = totalPage;
}
if (startNum < 1) {
startNum = 1;
}
// 如果显示页码数量不够则进行补数
if(endNum - startNum < showNum) {
int tmp;
if ((tmp = endNum - showNum + 1) > 0) {
startNum = tmp;
}
else if((tmp = startNum + showNum - 1) < totalPage) {
endNum = tmp;
}
}
return new int[]{startNum, endNum};
}
}

注意:输入的为闭区间(包含两端页码值)范围。


观点仅代表自己,期待你的留言。

Spring-AOP实现之注解

AOP概念

AOP术语:

  • 切面(Aspect):一个关注点的模块化,这个关注点可能会横切多个对象。事务管理是J2EE应用中一个关于横切关注点的很好的例子。在Spring AOP中,切面可以使用基于模式或者基于@Aspect注解的方式来实现。
  • 连接点(Joinpoint):在程序执行过程中某个特定的点,比如某方法调用的时候或者处理异常的时候。在Spring AOP中,一个连接点总是表示一个方法的执行。
  • 通知(Advice):在切面的某个特定的连接点上执行的动作。其中包括了“around”、“before”和“after”等不同类型的通知(通知的类型将在后面部分进行讨论)。许多AOP框架(包括Spring)都是以拦截器做通知模型,并维护一个以连接点为中心的拦截器链。
  • 切入点(Pointcut):匹配连接点的断言。通知和一个切入点表达式关联,并在满足这个切入点的连接点上运行(例如,当执行某个特定名称的方法时)。切入点表达式如何和连接点匹配是AOP的核心:Spring缺省使用AspectJ切入点语法。
  • 引入(Introduction):用来给一个类型声明额外的方法或属性(也被称为连接类型声明(inter-type declaration))。Spring允许引入新的接口(以及一个对应的实现)到任何被代理的对象。例如,你可以使用引入来使一个bean实现IsModified接口,以便简化缓存机制。
  • 目标对象(Target Object): 被一个或者多个切面所通知的对象。也被称做被通知(advised)对象。 既然Spring AOP是通过运行时代理实现的,这个对象永远是一个被代理(proxied)对象。
  • AOP代理(AOP Proxy):AOP框架创建的对象,用来实现切面契约(例如通知方法执行等等)。在Spring中,AOP代理可以是JDK动态代理或者CGLIB代理。
  • 织入(Weaving):把切面连接到其它的应用程序类型或者对象上,并创建一个被通知的对象。这些可以在编译时(例如使用AspectJ编译器),类加载时和运行时完成。Spring和其他纯Java AOP框架一样,在运行时完成织入。

通知类型:

  • 前置通知(Before advice):在某连接点之前执行的通知,但这个通知不能阻止连接点之前的执行流程(除非它抛出一个异常)。
  • 后置通知(After returning advice):在某连接点正常完成后执行的通知:例如,一个方法没有抛出任何异常,正常返回。
  • 异常通知(After throwing advice):在方法抛出异常退出时执行的通知。
  • 最终通知(After (finally) advice):当某连接点退出的时候执行的通知(不论是正常返回还是异常退出)。
  • 环绕通知(Around Advice):包围一个连接点的通知,如方法调用。这是最强大的一种通知类型。环绕通知可以在方法调用前后完成自定义的行为。它也会选择是否继续执行连接点或直接返回它自己的返回值或抛出异常来结束执行。

配置实现

实例需求: 监控各Api接口执行时间,找出耗时的业务操作。
1、启用@AspectJ支持
spring.xml

1
2
3
4
5
6
7
8
9
10
11
12
13
14
15
16
17
<beans xmlns="http://www.springframework.org/schema/beans"
xmlns:xsi="http://www.w3.org/2001/XMLSchema-instance" xmlns:mvc="http://www.springframework.org/schema/mvc"
xmlns:util="http://www.springframework.org/schema/util" xmlns:context="http://www.springframework.org/schema/context"
xmlns:tx="http://www.springframework.org/schema/tx" xmlns:aop="http://www.springframework.org/schema/aop"
xmlns:cache="http://www.springframework.org/schema/cache" xmlns:p="http://www.springframework.org/schema/p"
xsi:schemaLocation="http://www.springframework.org/schema/beans http://www.springframework.org/schema/beans/spring-beans.xsd
http://www.springframework.org/schema/mvc http://www.springframework.org/schema/mvc/spring-mvc.xsd
http://www.springframework.org/schema/tx http://www.springframework.org/schema/tx/spring-tx.xsd
http://www.springframework.org/schema/aop http://www.springframework.org/schema/aop/spring-aop.xsd
http://www.springframework.org/schema/context http://www.springframework.org/schema/context/spring-context.xsd
http://www.springframework.org/schema/util http://www.springframework.org/schema/util/spring-util.xsd
http://www.springframework.org/schema/cache http://www.springframework.org/schema/cache/spring-cache-3.2.xsd"
default-lazy-init="true">

<aop:aspectj-autoproxy />

</beans>

2、增加aspectj依赖库
pom.xml

1
2
3
4
5
6
7
8
9
10
<dependency>
<groupId>org.aspectj</groupId>
<artifactId>aspectjrt</artifactId>
<version>1.7.4</version>
</dependency>
<dependency>
<groupId>org.aspectj</groupId>
<artifactId>aspectjweaver</artifactId>
<version>1.7.4</version>
</dependency>

3、编写切面类

1
2
3
4
5
6
7
8
9
10
11
12
13
@Aspect
@Repository
public class AspectPoint {

@Around("within(org.wujianjun.apps.service..*)")
public Object doBasicProfiling(ProceedingJoinPoint pjp) throws Throwable {
final long beginTime = System.currentTimeMillis();
Object res = pjp.proceed(pjp.getArgs());
final long endTime = System.currentTimeMillis();
System.out.println(pjp.getTarget().getClass().getSimpleName()+"."+pjp.getSignature().getName()+"-->"+(endTime-beginTime)+"ms");
return res;
}
}

对比一下xml配置

1
2
3
4
5
6
7
8
9
10
11
12
13
14
15
16
17
18
19
20
21
22
23
<beans xmlns="http://www.springframework.org/schema/beans"
xmlns:xsi="http://www.w3.org/2001/XMLSchema-instance" xmlns:mvc="http://www.springframework.org/schema/mvc"
xmlns:util="http://www.springframework.org/schema/util" xmlns:context="http://www.springframework.org/schema/context"
xmlns:tx="http://www.springframework.org/schema/tx" xmlns:aop="http://www.springframework.org/schema/aop"
xmlns:cache="http://www.springframework.org/schema/cache" xmlns:p="http://www.springframework.org/schema/p"
xsi:schemaLocation="http://www.springframework.org/schema/beans http://www.springframework.org/schema/beans/spring-beans.xsd
http://www.springframework.org/schema/mvc http://www.springframework.org/schema/mvc/spring-mvc.xsd
http://www.springframework.org/schema/tx http://www.springframework.org/schema/tx/spring-tx.xsd
http://www.springframework.org/schema/aop http://www.springframework.org/schema/aop/spring-aop.xsd
http://www.springframework.org/schema/context http://www.springframework.org/schema/context/spring-context.xsd
http://www.springframework.org/schema/util http://www.springframework.org/schema/util/spring-util.xsd
http://www.springframework.org/schema/cache http://www.springframework.org/schema/cache/spring-cache-3.2.xsd"
default-lazy-init="true">

<bean id="aspectPoint" class="AspectPoint" />
<aop:aspectj-autoproxy/>
<aop:config>
<aop:aspect ref="aspectPoint">
<aop:around method="doBasicProfiling" pointcut="within(org.wujianjun.apps.service..*)" />
</aop:aspect>
</aop:config>

</beans>

附上测试业务实现类

1
2
3
4
5
6
7
8
9
10
11
12
13
14
15
16
17
18
19
20
package org.wujianjun.apps.service.impl;

@Service
public class ExampleServiceImpl implements ExampleService {
private final static Logger LOG = LoggerFactory
.getLogger(ExampleServiceImpl.class);

@Resource
private ExampleManager exampleManager;

@Override
public void test() {
System.out.println("test--");
try {
Thread.sleep(100);
} catch (InterruptedException e) {
e.printStackTrace();
}
}
}

4、测试结果

1
2
3
4
5
6
7
8
9
10
11
12
13
14
六月 30, 2016 4:11:07 下午 org.apache.coyote.AbstractProtocol start
信息: Starting ProtocolHandler ["http-bio-8080"]
test--
ExampleServiceImpl.test-->103ms
test--
ExampleServiceImpl.test-->105ms
test--
ExampleServiceImpl.test-->103ms
test--
ExampleServiceImpl.test-->103ms
test--
ExampleServiceImpl.test-->100ms
test--
ExampleServiceImpl.test-->104ms

配置说明

AspectJ切入点指示符:

  • execution - 匹配方法执行的连接点,这是你将会用到的Spring的最主要的切入点指示符。
    具体格式:execution(modifiers-pattern? ret-type-pattern declaring-type-pattern? name-pattern(param-pattern)throws-pattern?)
    示例: execution(* com.xyz.service...(..) - 在service包或其子包中定义的任意方法的执行
  • within - 限定匹配特定类型的连接点(在使用Spring AOP的时候,在匹配的类型中定义的方法的执行)。
    示例: within(com.xyz.service..*) - 在service包或其子包中的任意连接点(在Spring AOP中只是方法执行),包含类和接口
  • this - 限定匹配特定的连接点(使用Spring AOP的时候方法的执行),其中bean reference(Spring AOP 代理)是指定类型的实例。
    示例: this(com.xyz.service.AccountService) - 实现了AccountService接口的代理对象的任意连接点 (在Spring AOP中只是方法执行)
  • target - 限定匹配特定的连接点(使用Spring AOP的时候方法的执行),其中目标对象(被代理的应用对象)是指定类型的实例。
    示例: target(com.xyz.service.AccountService) - 实现AccountService接口的目标对象的任意连接点 (在Spring AOP中只是方法执行)
  • args - 限定匹配特定的连接点(使用Spring AOP的时候方法的执行),其中参数是指定类型的实例。
    示例: args(java.io.Serializable) - 任何一个只接受一个参数,并且运行时所传入的参数是Serializable 接口的连接点(在Spring AOP中只是方法执行)
  • bean - 标记可以是任何Spring bean的名字支持通配符’*’。
    示例: bean(*Service) - 任何一个在名字匹配通配符表达式’*Service’的Spring bean之上的连接点 (在Spring AOP中只是方法执行)
  • @target - 限定匹配特定的连接点(使用Spring AOP的时候方法的执行),其中正执行对象的类持有指定类型的注解。
    示例: @target(org.springframework.transaction.annotation.Transactional) - 目标对象中有一个 @Transactional 注解的任意连接点 (在Spring AOP中只是方法执行)
  • @args - 限定匹配特定的连接点(使用Spring AOP的时候方法的执行),其中实际传入参数的运行时类型持有指定类型的注解。
    示例: @args(com.xyz.security.Classified) - 任何一个只接受一个参数,并且运行时所传入的参数类型具有@Classified 注解的连接点(在Spring AOP中只是方法执行)
  • @within - 限定匹配特定的连接点,其中连接点所在类型已指定注解(在使用Spring AOP的时候,所执行的方法所在类型已指定注解)。
    示例: @within(org.springframework.transaction.annotation.Transactional) - 任何一个目标对象声明的类型有一个 @Transactional 注解的连接点 (在Spring AOP中只是方法执行)
  • @annotation - 限定匹配特定的连接点(使用Spring AOP的时候方法的执行),其中连接点的主题持有指定的注解。
    示例: @annotation(org.springframework.transaction.annotation.Transactional) - 任何一个执行的方法有一个 @Transactional 注解的连接点 (在Spring AOP中只是方法执行)

注意:切入点表达式可以使用’&’, ‘||’ 和 ‘!’来组合

通知类型声明注解:

  • 前置通知 - 使用 @Before 注解声明
  • 后置通知 - 使用 @AfterReturning 注解来声明
  • 异常通知 - 使用@AfterThrowing注解
  • 最终通知 - 使用@After 注解来声明
  • 环绕通知 - 使用@Around注解来声明

共享通用切入点定义

通过@Pointcut先定义好切入点, 当通知类型可以通过被 @Pointcut 标识的方法名直接共享其切入点配置。

示例:

1
2
3
4
5
6
7
8
9
10
11
12
13
14
15
16
17
package com.xyz.someapp;

@Aspect
public class SystemArchitecture {
@Pointcut("within(com.xyz.someapp.web..*)")
public void inWebLayer() {}

@Before("com.xyz.someapp.SystemArchitecture.inWebLayer()")
public void doBefore() {

}

@After("com.xyz.someapp.SystemArchitecture.inWebLayer()")
public void doAfter() {

}
}

获取切入点更多的信息

任何通知方法可以将第一个参数定义为org.aspectj.lang.JoinPoint类型 (环绕通知需要定义第一个参数为ProceedingJoinPoint类型, 它是 JoinPoint 的一个子类)。JoinPoint 接口提供了一系列有用的方法,比如 getArgs()(返回方法参数)、 getThis()(返回代理对象)、getTarget()(返回目标)、 getSignature()(返回正在被通知的方法相关信息)和 toString() (打印出正在被通知的方法的有用信息)。


http://shouce.jb51.net/spring/aop.html

观点仅代表自己,期待你的留言。

Spring多视图配置及源码剖析

简介

在MVC架构中,Controller被用于连接Model与View,同时控制View的显示与跳转。在以往的开发实践中常常是直接将View与Controller放置在同一个Project中,如果此时想要真正实现Controller与View的分离,View与Controller的交互就只能通过HTTP+数据格式或者ajax实现。那么Controller所需要做的就是将数据通过api的方式提供给View。此时针对Controller就需要将数据进行api和view的两种完全不同的视图呈现。好在Spring已经给我们提供了org.springframework.web.servlet.view.ContentNegotiatingViewResolver来实现。

Spring多视图配置

spring-web.xml

1
2
3
4
5
6
7
8
9
10
11
12
13
14
15
16
17
18
19
20
21
22
23
24
25
26
27
28
29
30
31
32
33
34
35
36
37
38
39
40
41
42
43
44
45
46
47
48
49
50
51
52
53
54
<!--配置消息转换器-->
<mvc:annotation-driven>
<mvc:message-converters register-defaults="true">
<bean class="org.springframework.http.converter.StringHttpMessageConverter">
<constructor-arg value="UTF-8"/>
<property name="supportedMediaTypes">
<list>
<value>application/xml;charset=UTF-8</value>
<value>text/html;charset=UTF-8</value>
<value>text/plain;charset=UTF-8</value>
<value>application/json;charset=UTF-8</value>
</list>
</property>
</bean>
<bean class="org.springframework.http.converter.json.MappingJackson2HttpMessageConverter">
<property name="prettyPrint" value="true"/>
</bean>
</mvc:message-converters>
</mvc:annotation-driven>
<!--多视图解析配置-->
<bean class="org.springframework.web.servlet.view.ContentNegotiatingViewResolver">
<property name="defaultContentType" value="text/html;charset=UTF-8" />
<!-- not by accept header -->
<property name="ignoreAcceptHeader" value="true"/>
<property name="favorPathExtension" value="true"/>
<property name="favorParameter" value="true"/>
<property name="useNotAcceptableStatusCode" value="true" />
<!-- by extension -->
<property name="mediaTypes">
<map>
<entry key="xml" value="application/xml" />
<entry key="json" value="application/json" />
<entry key="httl" value="text/html" />
</map>
</property>
<property name="viewResolvers">
<list>
<ref bean="httlViewResolver"/>
</list>
</property>
<property name="defaultViews">
<list>
<bean class="org.springframework.web.servlet.view.json.MappingJackson2JsonView" />
<bean class="org.springframework.web.servlet.view.xml.MappingJackson2XmlView" />
</list>
</property>
</bean>

<!-- 视图解析器配置 -->
<bean id="httlViewResolver" class="httl.web.springmvc.HttlViewResolver">
<property name="suffix" value=".view"/>
<property name="contentType" value="text/html;charset=UTF-8"/>
<property name="attributesMap" ref="viewTools" />
</bean>

Controller.java

1
2
3
4
5
6
7
8
9
10
@Controller
@RequestMapping("/")
public class CommonController {
@RequestMapping("index")
public ModelAndView indexPage() {
Map<String, Object> param = new HashMap<>();
param.put("_model_", new Example());
return getView("index", param);
}
}

以上为多视图配置的全部内容,配置中我们提供了三种视图。

  1. httl的页面视图。 通过访问/index或/index.httl就可以得到。
  2. json的数据视图。 通过访问/index.json就可以得到。
  3. xml的数据视图。 通过访问/index.xml就可以各到。

    这里需要注意的是,由于xml只有一个根节点,所以返回的param的Map中只能包含一个元素。如果配置多个map元素,则会抛出异常java.lang.IllegalStateException: Model contains more than one object to render, only one is supported

useNotAcceptableStatusCode:这个配置表示,当配置为true且不能找到你需要的配置时返回HttpStatus 406. 默认值为false

Spring源码剖析

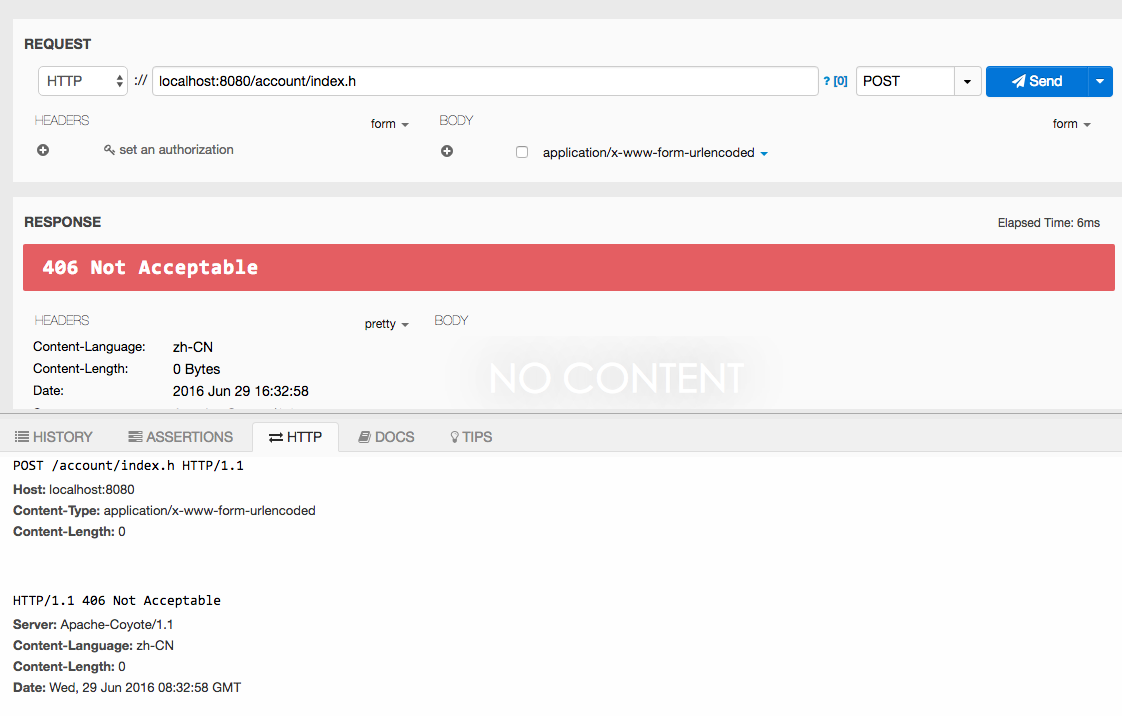
首先当然是org.springframework.web.servlet.view.ContentNegotiatingViewResolver类,经过断点跟踪后,发现是通过resolveViewName()来定位的显示View。

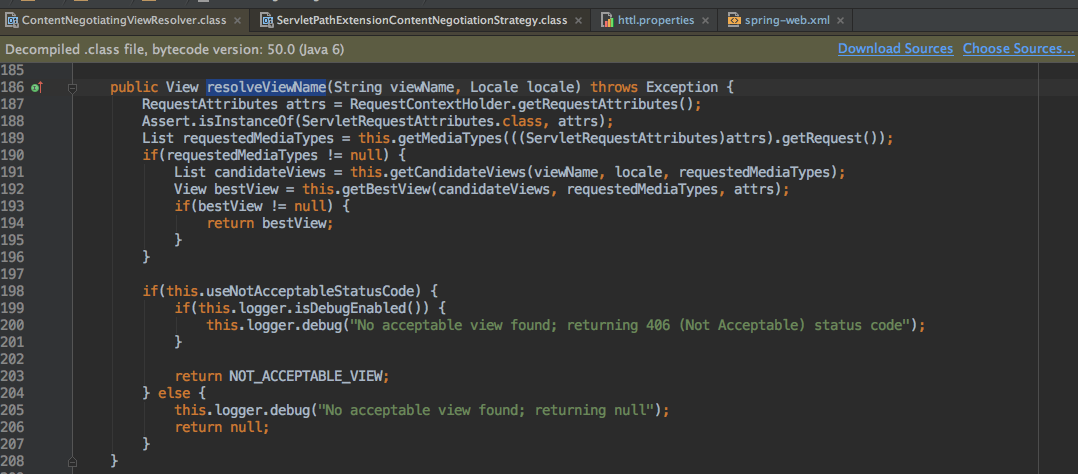
从图上可以看出,先通过request获取到requestedMediaTypes。

获取请求的视图格式


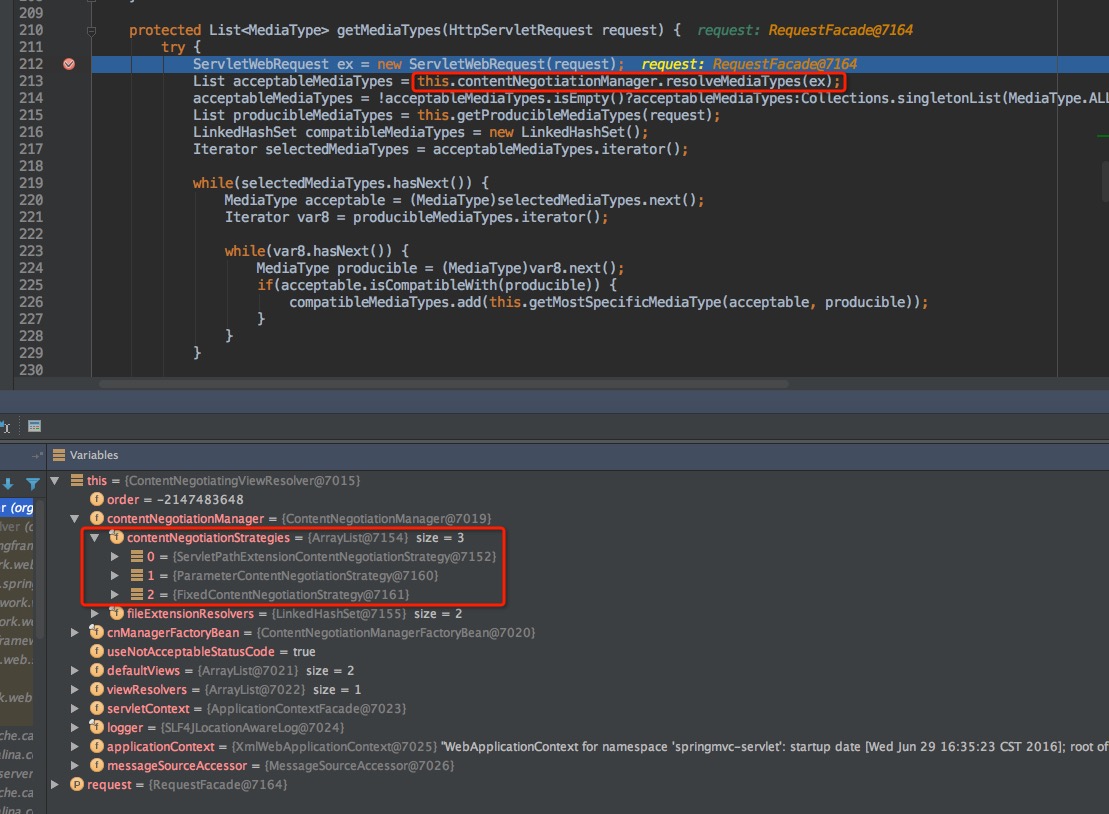
再深入一层查看,发现这里是针对requestedMediaTypes的过滤,而获取请求格式有三个途径,
ServletPathExtensionContentNegotiationStrategy(继承自PathExtensionContentNegotiationStrategy),
ParameterContentNegotiationStrategy
FixedContentNegotiationStrategy
而这恰好对应了Spring中针对识别多视图标识的配置

1
2
3
<property name="ignoreAcceptHeader" value="true"/>
<property name="favorPathExtension" value="true"/>
<property name="favorParameter" value="true"/>

所以可以得出结论:
1、HeaderContentNegotiationStrategy对应ignoreAcceptHeader的配置,此处配置为false,那么ContentNegotiatingViewResolver.contentNegotiationManager属性里则会多出一个元素。通过其源码可以得到它是通过在request header中增加Accept消息头获取视图格式。
2、ServletPathExtensionContentNegotiationStrategy(或者PathExtensionContentNegotiationStrategy)对应favorPathExtension的配置。通过请求后缀获取视图格式。
3、ParameterContentNegotiationStrategy对应favorParameter的配置,通过在request uri中增加format=?获取视图格式。

按requestdMediaTypes获取到支持的ViewResolver

1
List candidateViews = this.getCandidateViews(viewName, locale, requestedMediaTypes);


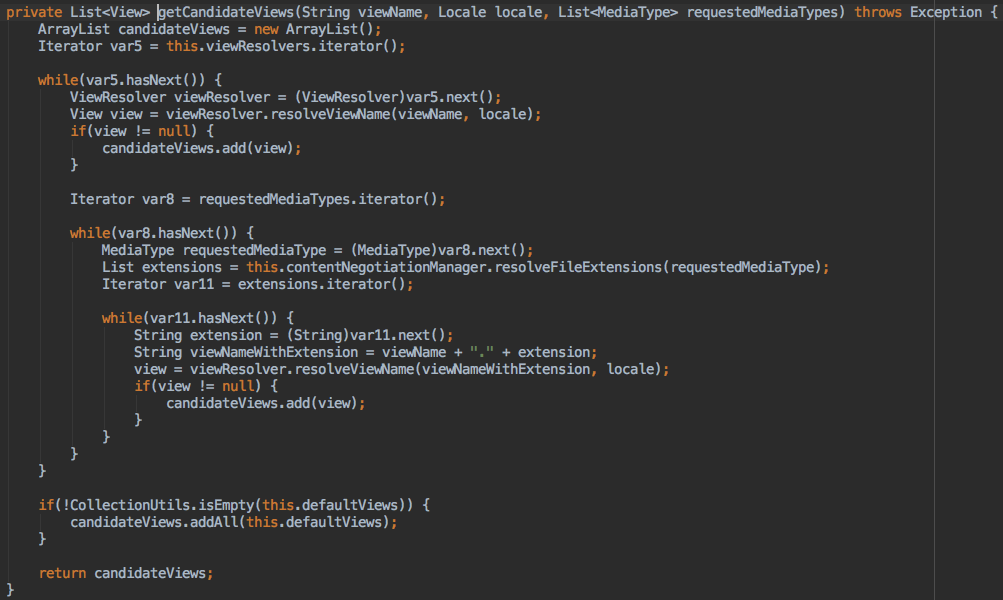
这里所做的事,就是将controller处理完成的view名称拿到配置的ViewResolver里去查找(视图名称和加了后缀的视图名称两步搜索),最后再将配置的defaultViews直接加入到返回结果的List中。此处忽略掉了视图格式标识。

获取匹配度最高的View

1
View bestView = this.getBestView(candidateViews, requestedMediaTypes, attrs);

此方法所做的事:将包含视图名称的ViewResolver按requestedMediaTypes找到匹配度最高的View。
如果没有找到,则按useNotAcceptableStatusCode返回HttpCode 406.或者通过candidateViews的第一个进行视图渲染。__这里的顺序可以通过配置viewResolvers的order属性确定__。

Velocity与Httl视图工具类实例处理方案

由于在页面视图中我们需要用到很多的工具类来对Controller返回的数据进行判断以及转换等操作,所以一般来讲我们会在Map存入工具类的实例对象以便能在Page中直接使用。
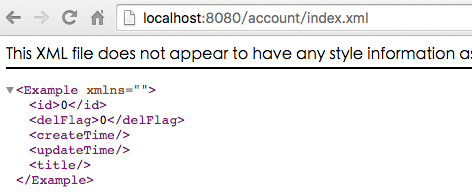
但是当返回的为xml视图时,由于元素数据限制为1个,所以这些工具类将会导致多视图不能返回xml的数据格式。

在Velocity中可以配置toolbox等工具组件来实现,但是Httl并未支持。所以我找到另一个实现方式。

经过源码的查看,UrlBasedViewResolver类中包含一个staticAttributes的Map类型属性,这里完全可以拿来存放工具类对象实例,staticAttributes属性的get和set方法名称为:setAttributesMap()和getAttributesMap(). 所以配置的时候要注意配置名为__attributesMap__。
而HttlViewResolver与VelocityLayoutViewResolver都间接继承自UrlBasedViewResolver,所以可以通过配置attributesMap属性来实现工具类实例的配置。


观点仅代表自己,期待你的留言。

Maven打包source与javadoc

pom.xml

1
2
3
4
5
6
7
8
9
10
11
12
13
14
15
16
17
18
19
20
21
22
23
24
25
26
27
28
29
30
31
32
33
34
<project xmlns="http://maven.apache.org/POM/4.0.0" xmlns:xsi="http://www.w3.org/2001/XMLSchema-instance" xsi:schemaLocation="http://maven.apache.org/POM/4.0.0 http://maven.apache.org/xsd/maven-4.0.0.xsd">
<build>
<plugins>
<plugin>
<groupId>org.apache.maven.plugins</groupId>
<artifactId>maven-source-plugin</artifactId>
<version>2.2.1</version>
<executions>
<execution>
<id>create-source</id><!--指定一个名字-->
<phase>compile</phase><!--在编译阶段生成source包-->
<goals>
<goal>jar</goal><!--指定生成的文件为jar包-->
</goals>
</execution>
</executions>
</plugin>
<plugin>
<groupId>org.apache.maven.plugins</groupId>
<artifactId>maven-javadoc-plugin</artifactId>
<version>2.9.1</version>
<executions>
<execution>
<id>create-doc</id><!--指定一个名字-->
<phase>compile</phase><!--在编译阶段生成javadoc包-->
<goals>
<goal>jar</goal><!--指定生成的文件为jar包-->
</goals>
</execution>
</executions>
</plugin>
</plugins>
</build>
</project>

结论:由于指定插件在phase=compile时期生成源码与Javadoc,当执行完成编译后,会在target目录下生成三个文件,xxx.jar,xxx-javadoc.jar,xxx-sources.jar


观点仅代表自己,期待你的留言。